Note: This entry has been restored from old archives.
After a BBQ lunch last week I acted on my curiosity regarding the apples overhanging our little back yard (and frequently crashing to Earth to thump, thud, or clang on an item of backyard paraphenalia.) I pulled out my big-long-lopper and plucked off one of the larger specimens. Based on size and shape we’ve been suspecting that they’re Bramleys, a classic, though only 200 year old, cooking apple. I cut my specimen in half and had a nibble. The taste, sharp yet sweet (similar to the good old Grannies back home), and texture (crisp) indicated that our suspicions could be right in this regard – though this certainly isn’t enough to confirm the identification!

Bramleys are excellent cooking apples, and they’re especially good for making jellies. This train of thought pulled my gaze over to the Elder tree, covered in sprays of glistening fruit. Elder fruit aren’t all that wonderful on their own, though I hear you can make great wine or cordial from them, but they’re an excellent addition to jellies and jams. It seemed that fate had decreed that the future must contain jelly.

Be aware that elder trees contain a toxin and that eating the raw fruit is strongly discouraged! I’ve read that the level of toxin in the berries diminishes as they ripen though, and is already quite low in the variety of Elder most commonly found in the UK. So, after a little research, I did what you should not: tasted a raw Elderberry! Ooo-errr. The flavour, I can report in a still-healthful state, is surprisingly similar to grape! Maybe somewhat more like a dark wine grape like Cabernet Sauvignon, though with less flavour and greater acidity. I’ve done some further research on the subject of Elder toxicity but failed to find any definitive reference on the subject. One variety of Elder is considered poisonous, but it is mainly found in mainland Europe and the berries ripen to red as opposed to the near-black of the common Elders in the UK. Aside from that it seems that all Elders contain the toxin, a plant cyanide, in varying degrees. The roots, wood, and leaves have high amounts of the toxin – but the flowers are OK, and the toxin in the berries reduces as they ripen. Many foraging sites contain advice along the lines of “taste a few berries from each tree so you can choose the one with the tastiest fruit!” I used to eat Elderberries off our tree when I was a kid, I guess it’s a good thing they were never appealing enough to eat by the bucket-load.
Anyway, don’t worry. The toxin is destroyed in the cooking process.

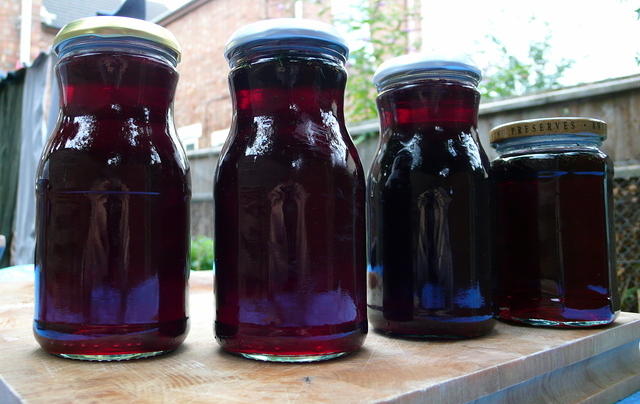
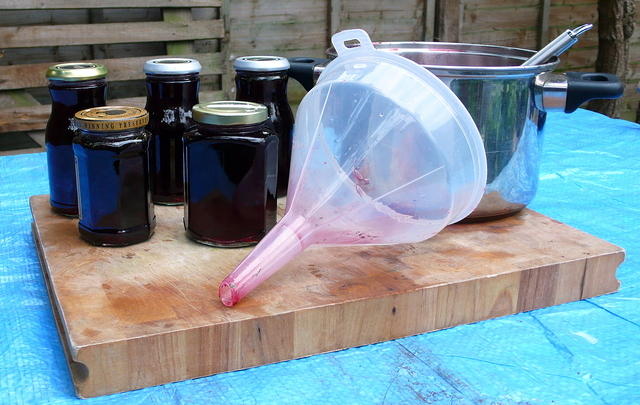
With Kat catching falling fruit in bags and baskets I went mad with my big-long-loppers. Well, not too mad, as in the end we had just 1.3kg of apples and a pint of berries. But that’s enough for a decent lot of jelly, 5 assorted jars, just under 1.5 litres in total. The elder tree is in our yard, I really hate it as it is a major sun block, it is a small consolation to get something useful from it. The apple tree is actually in the neighbours yard, but is clearly uncared for and I suspect they see the apples as more of a nuisance than a resource!
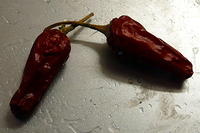
Along the way further produce from our own gardens was brought into the mix. The “bite” comes from dried chillies that we grew 2 years ago (we have a near endless supply of chillies stashed away from two plants we grew on the balcony.) I added the chilli since we’re almost out of the excellent Apple and Calvados jelly made by the dudes at Fat man Chilli, unfortunately only available at the Rose and Crown farmers’ market back near Rickmansworth. A couple of jars also sport some chopped-leaf floaties harvested from the coriander plants in the garden.
Be prepared
On with the recipe! Ingredients:
- 1.3kg — Bramley apples, windfall apples are fine (even shop-bought ones I suppose!)
- 1 pint (sorry, forgot to weigh) — elderberries (plucked from 20 sprays)
- 5 — hot little chillies
- 450g per 570ml liquid, ~1.3kg — granulated sugar
- “to taste” — Grand Marnier
This is pleasingly simple, don’t be fooled by my verbosity. Be aware that it takes quite some time to complete from end-to-end, as the straining of the jelly needs at least a few hours. First thing’s first, you should have these useful kitchen items available:
- A “big enough” pot, for the amounts in this recipe a ~5lt 22cm stockpot was perfect.
- Muslin
, which is available from catering shops, I buy mine from Nisbets. – I’ve read that a plain (non-fluffy!) tea-towel is acceptable.
- A flat, fine sieve is very useful for scum-skimming.
- A large funnel, otherwise you’ll make a mess!
- Jars, smaller sizes are better I believe but it really depends on what you have lying around. You need around 1.5lt worth of jars for the amounts in this recipe. (With lids!)
- A thermometer helps, there are simple
(Most of these should be visible in the various photos of this jelly-making.)
Feeling fruity
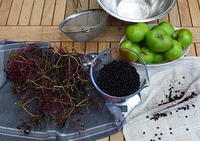
Dump the sprays of elderberries into a bowl of water and swirl them around a bit. Pick over each spray, collecting all the plump and unwrinkled berries in your cooking pot. Avoid any that are still rather green. Also refrain from eating the berries, as mentioned earlier uncooked elderberries contain a toxin that is best avoided. We found that 20 sprays of berries yielded about a pint of berries. It shouldn’t matter much if you have less or more. Remember to grab the good berries that have fallen off in the bowl too (probably at least a large handful!)
Give your apples a wash. Cut them up into, very roughly, 1-inch cubes (core, skin, and all) and cut off and discard any iffy bits. Toss the lot into your pot!
Now add the chillies (roughly chopped) and water to the pot. Just enough water to cover over the apples. The apples will probably be rather floaty, so be careful not to add too much water. Some recipes I’ve read fill with water to only 3 quarters the height of the apples, this should yield a stronger flavoured jelly I suppose.
Put the pot on the stove and bring to a boil then reduce to a low simmer. Simmer like this until the apples have essentially dissolved into mush. I simmered the pot for about an hour, but 30 minutes should be enough. After this time turn off the heat and let the pot sit for a while, 30 minutes say, until it has cooled a bit (for safety and comfort!)
Taking the strain
Take a square of muslin, a 50cm (20″) square is a good size. From many of the sources I’ve read it is suggested that this should be “sterilised,” though given that the jelly is going to be boiled for at least another 30 minutes after being strained I’m not sure this is useful! Anyway, the best sterilization method I came across is to iron the muslin with an iron on it’s hottest setting. Easy, so may as well do it.
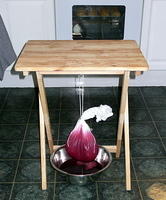
The muslin can now be laid over a suitable bowl, a 4 or 5 litre mixing bowl is good. Pour the simmered fruit sludge into the muslin then lift the muslin by the edges, give it a twist to form a sealed “bag” and tie it off with some string. Now build some sort of contraption that lets you hang the bag over the bowl, preferably in a way that allows the whole lot to be covered over somehow to keep insects out. The photos to the right show how I’ve gone about this, the whole lot was covered over with an old doona cover.
Leave for a while. I leave it overnight as it is convenient, but 3 hours is probably enough (I can’t imagine getting much more than a few more teaspoons of liquid out beyond that.)
Getting sweet
Once you’re ready for the next step there’s a few things worth doing in preparation. First give your jars and lids a good wash and sterilise them. I’ve read that a run through a dish-washing machine is sufficient for this (for both the jars and lids), possibly just the rinse cycle even since it is nice and hot. We don’t have such a contraption so I use the oven method for the jars. Place the washed jars upside-down on a wire rack in a cold oven, heat the oven up to 150°C (get on with preparing the jelly while it heats) and turn it off once it is there. Let the jars sit in the oven until you’re ready to use them (likewise, if you’ve used a dishwasher leave the jars in it.) We’ll deal with the lids later. The other thing worth doing at this point is getting a saucepan of water simmering on the stove, I keep the metal spoon and sieve used for stirring and scum-skimming in this. All in the name of sterilisation!
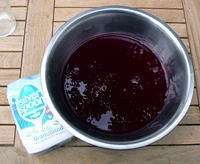
Via a measuring jug, pour the strained liquid back into the pot used to simmer the fruit, cleaned by now I hope! Toss out the pulp from the muslin, but it is worth cleaning and re-using the muslin itself (just rinse/soak thoroughly a few times and finally rinse in boiling water from the kettle.) At this point we add the sugar, the traditional formula is 1-pound-per-pint – thus 450g per 570ml. I had 1.67 litres of liquid at this point so used 1.33kg of sugar. You don’t need to be too precise about it really.
Put the pot over a medium flame and bring to a boil. If you desire, this is the point to add in the Grand Marnier, when the liquid is still cool enough to taste stir in a little Grand Marnier at a time until the flavour reaches a point you’re happy with (purely a matter of personal taste, but I recommend being conservative – just a hint.) I also put in a little muslin bag containing 3 chopped dried chillies at this point, because the two I put in originally hadn’t given the liquid enough bite – again this is a matter of taste, you could leave out the “bite” entirely if you wish.

As the liquid heats and boils creamy scum will form on the surface. This is where a flat fine-mesh strainer is useful, but you can do your scum-skimming with a spoon too – just try not to catch too much good liquid with it!
Once the liquid is boiling keep it boiling until it has reached “setting point.”
What is “setting point?” It’s the point at which your sugary liquid has actually become a jelly. There are two common methods for determining when you’ve reached this magical point. The first is to use a thermometer, you can get specialist jam/sugar thermometers for this but I use a general -15-to-200°C digital probe thermometer. Relying on just a thermometer your jam has reached “setting point” at about 105°C. The second method is more practical and makes a lot of sense. Before you start making your jelly put a small plate or two (I use saucers) into the fridge. Your jam has reached setting point when a spoonful of it put on the plate and put in the fridge for 2 minutes bunches up when you drag a fingertip through it, your finger should leave a trail behind it. I use both methods, I keep track of the temperature of the boiling liquid until it is at around 103°C, then I test with the plate method every 5 or so minutes until I’m happy with the result.
A jarring experience
My jelly was on the boil for about 35 minutes by the time I was satisfied that it’d set well. The temperature at this point was floating around 104.5°C.
Put a lid on the jelly pot and set it aside for 10 minutes to cool. Meanwhile put a ladle into your saucepan of simmering water and, if you haven’t used the dishwasher, throw in the jar lids too. You can turn this off after 5 minutes, put the ladle into the jelly and the lids bottom-down onto a clean cloth. Use the simmering water to sterilise the end of your funnel too, then pour the water through the funnel for the same reason. Now grab the jars from the oven.
With ladle and funnel fill each jar, leaving as small an airspace at the top as you’d usually expect. Securely screw on the lids and set aside to cool. Done!
In conclusion
I’ve read various expectations on what sort of shelf-life you can expect (stored in a cool, dark cupboard) – around 2 years seems common. I’ve never had a jelly survive being eaten for long enough to know from my own experience!
After I’d filled 3 jars I stirred a couple of tablespoons of chopped coriander leaf into the remaining jelly and did two more. Since the coriander is fresh and not in any way sterilised I expect this will reduce the expected lifetime of the jelly! One of these is for opening right away though, and the other probably next.
The whole sterilising thing is a bit haphazard. Most sources I’ve read recommend sterilising the muslin and the jars, but never talk about sterilising anything else! I think it is best to be as thorough as practical.
I can happily report that my jelly set perfectly, it holds form well but isn’t too firm.