Roast Saddle of Hare

Note: This entry has been restored from old archives.

Roast Saddle of Hare

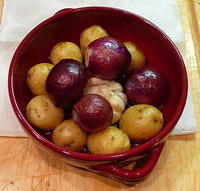
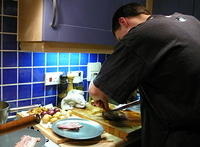
Last weekend I covered the stock I made with the hare offcuts and forelegs, now I’ll get on with a description of the prime meal our hare gave us: Roast Saddle of Hare. This is the second recipe (in this case maybe production is a more accurate term) in my Harey Weekend series. I took a rather straightforward path with this one, marinating the saddle for a couple of hours in herby olive oil, barding with streaky bacon, and roasting it along with some garlic, onions and new potatoes. I also prepared steamed yeasty, herby dumplings, making up a recipe on the spot for them, and crispy parsnip chips.

As far as cooking times and general information goes, the books I consulted were the usual The River Cottage Meat Book, as well as The Game Cookbook. Both were a little light on roasting information unfortunately, my approach to roasting the beast was mainly informed by the Meat Book though I extended the time given by Hugh just a little (and I don’t think you’d want the hare any rarer than we had it.) I also took Hugh’s advice on board and didn’t marinate (“pickle”, he says) the meat in wine beforehand, choosing instead plenty of oil. The Game Cookbook, as usual for game, provides the better and most complete back-story on the history of eating, and mythology of, hares. While The Meat Book, I found, gave slightly better detail on working with the hare. Clarissa gives many more recipes than Hugh though, The Meat Book has only a single hare recipe: Jugged Hare. Which is the classic hare dish, there’s a version in both books and they’re very different. The instructions I have here are, I believe, sufficient for the roasting – so if you’re after a book that gives hare a more detailed coverage I’d recommend The Game Cookbook out of the two.

Hare, saddle in middle

As far as the timing goes the first thing I did was marinate the hare about two hours before roasting it and then prepared the dumpling dough. Next, 30 minutes before roasting the saddle, I put the potatoes into the hot (200°C) oven to pre-roast a little. Just prior to roasting I unwrapped and barded the saddle and stuck it into the oven, which was boosted to 220°C, and threw the onions and garlic in with the potatoes. Total hare roasting time was only about 25 minutes, though the vegetables stayed in the oven for a further 20 minutes after the hare was removed. The final 20 minutes was the busiest, hare out of the oven, dumplings into the steamer, parsnips chips shallow-fried in batches, juices reduced with added double cream for a sauce. Around 3 hours end-to-end but only the last hour was particularly busy.

A 600g hare saddle serves two well and could do three at a pinch, but would be stingy for four (get two saddles then.) We got enough meat out of this for dinner and, thanks to plenty of sides, had a little left over for a salad the next day. For a larger roast (to serve four comfortably) you could include the rear legs, which are very meaty. It’s said that they tend to be dry though and work better for a casserole, which is what I did.

Anyway, the first thing I did was…

Marinating the Saddle

Premarinade

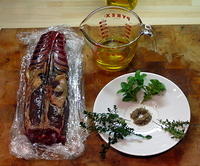
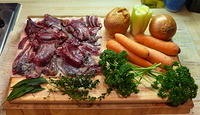
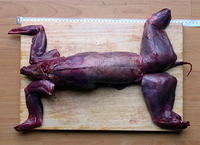
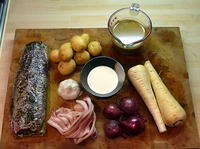
The butcher had jointed the hare for me, as shown in earlier photos, but the saddle still had some rough ends and the full rib enclosure, as well as the liver (lucky us to have an understanding butcher!) I cleaned up each end of the saddle, trimming away any loose meat and taking the cleaver to the neck end to remove it at the first rib. I entirely trimmed off the flaps of belly and cut through the rib cage all the way down to the meaty back, I used poultry shears to do this. The saddle and ingredients to the marinade are shown to the right (the garlic and juniper berries are missing.) The liver is still attached in that photo, however I carefully removed it and put it aside (to be used in the next recipe in this series.)

Hare has a rather tough membrane under the skin on the back and I wasn’t sure if I should remove this or not. In the end I decided not to and since the hare turned out so well I’ll stick with this approach in future. It means that marinating the hare may not be so effective maybe, but maybe the membrane does a good job of keeping the meat so moist and succulent! What I did do was thoroughly clean off any traces of hair and blood under a trickle of water then pat the saddle dry with plenty of paper towels.

Marinade Herbs

The ingredients for the marination are:

1 ~600g
hare saddle
⅓ cup
50/50 light and extra-virgin olive oil
3 sprigs
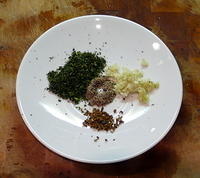
lemon thyme (4 o’clock above, 10 to right)
3 sprigs
common thyme (7 0’clock above, 10 to right)
3 sprigs
oregano (12 o’clock above, 10 to right)
2
garlic cloves (2 o’clock to right)
6
juiper berries (6 o’clock to right)
1tsp ground
black pepper (centre of both photos)
Oily Hare

The preparation of herbs and spices is shown in the photo to the right, they were all fairly finely chopped. Then the herbs were added to the olive oil and ⅓ of the oil spread onto a sheet of plastic wrap big enough to thoroughly wrap up the saddle. The saddle was placed on this oil then another ⅓ was rubbed all over it before tipping the final ⅓ over the top and thoroughly wrapping it up. This was left to sit in a corner, after an hour I turned it over and at the same time made the dumpling dough…

Yvan’s Yeasty Herby Dumplings

Dough!

This dumpling recipe is something I just threw together, it’s pretty simple. All the dumpling recipes I could find in the books I have either used baking soda or no raising agent at all, I wasn’t so happy with this idea and decided to try a yeasty butter dough instead, it worked out well. This recipe made enough for two little dumplings each to go with the hare (but we left one each for the next day) plus two more each to go with the casserole I later made with the hind-legs.

I’ve pulled this recipe out as separate from the roasting to reduce the overall complexity of this entry. However the dumplings were prepared and cooked at the same time as the roast, see the timeline at the bottom of the entry.

5g
dry yeast
150g
plain flour
50g
unsalted butter (room temperature or it’ll be too hard)
20g
extra virgin olive oil
5 sprigs
lemon thyme
3 sprigs
oregano
1/2tsp
salt
1tsp
ground pepper
Dough is Risen

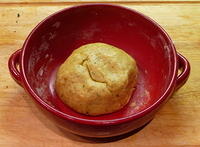
First, about 5 minutes in advance, put the yeast in a small ceramic dish and add about 30ml of lukewarm water. Once the yeast has turned frothy you can get on with making the dough. Into a separate dish place the flour, butter, and EVOO. Rub together with fingertips until well combined – the consistency should be crumbly and granular (“like breadcrumbs” the books usually say, it’s not a very accurate description I think.) Pull the leaves off the fresh herbs and chop finely, then add to the flour mixture. Also add the salt, pepper, and yeast liquid. Mix together well, with hands, until a soft dough is formed. I’ll cheat here and say the dough “should be like a soft shortcrust pastry dough”, and thus leave those who don’t make pastry mystified! It should almost be sticky, but not quite. It must be kneedable, since that’s what you’ll do next. Give it a 5 minute kneed on a smooth surface (since the dough is oily the surface shouldn’t need flouring or oiling.) If you do find it is too gooey carefully add more flour, alternately, if it seems too stiff add a little lukewarm water.

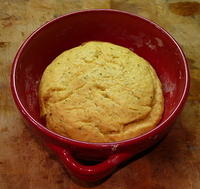
Ball up the dough and place into a bowl that’s a good three times the size of the dough-ball. Cover by placing inside a shopping bag and leave in a warm spot for an hour.

Into the Steamer

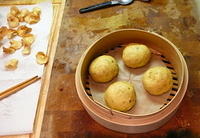
Just before you get on with preparing the hare (after putting the potatoes in the oven, see below) pull out the dough and give it a good kneed before breaking it into 8 evenly sized pieces and ball them up. To make the balls I pinch the dough into the bottom to avoid having creases on top, which would open up during cooking. These balls just sat up the back of my chopping board to puff up a little while I prepared the rest of the roast (you can see them sitting there in the parsnip photo below.)

As soon as the saddle was removed from the oven (below) I got four of the dumplings into a bamboo steamer over some simmering water in a wok. They steamed for 10 minutes and were then removed to a plate and plonked under an overhead grill to crisp up while I finished off the sauce and presented the rest of the meal for serving. Be careful here! I crisped them up a little too much, but they were fine. See the photo at the end of this entry, or the beginning. The four uncooked dumplings went into the fridge to be cooked another time.

The roasting, shallow-frying, and reducing

The main event, yet the least complicated! The roasting of the saddle is actually very quick to get the lovely rare and juicy end-product I was after, but the total roasting time was somewhat longer as required by the vegetables. The inputs to roasting (and sauce, and parsnip chips) were:

Ready for Roasting
8
new potatoes
4
small red onions
1 whole head
garlic
1 ~600g
marinated hare saddle
6 rashes
unsmoked streaky bacon
plenty
light olive oil for the vegetables
1 medium
parsnip (two are shown, but I only used one)
plenty
groundnut (peanut) oil for shallow-frying
250ml
rich hare stock (prepared earlier)
50ml
double cream

Roasting

Roasted Vegies

Pre-heat the oven to 200°C and get plenty of lightly salted water into a saucepan on the stove and bring it to a boil. Throw the potatoes into the boiling water for 5 minutes then drain and let dry in a colander. When the potatoes are dry (help them a little with a tea-towel maybe) place into an oven-proof dish into which they’ll fit fairly snugly with just enough room for the onions and garlic to be added later. Coat well with oil and let about 5mm of oil sit in the bottom of the bowl, grind over pepper and salt then into the oven for 30 minutes!

When the 30 minutes is up pull the sizzling potatoes out and toss in the oiled up onions and head of garlic, straight back into the oven with this lot and turn it up to 220°C.

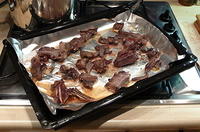
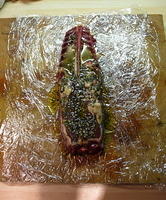
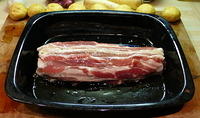
Now remove the hare saddle from the plastic wrap and place back-upwards in a roasting pan. Bard it with the streaky bacon, a typical rasher will be the perfect length to place lengthwise down the saddle (photo lower-right.) I plated each strip over the other working from the bottom up, then wrung all the excess oil out of the plastic wrap over the top of this.

Hare Barded

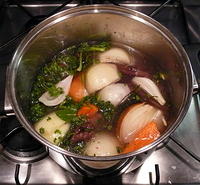
The saddle now goes into the 220° oven to sizzle, but a mere 10 minutes later you pour the stock into the pan (not over the saddle) and turn the dial down to 160°C. A further 15 minutes and the saddle is done! This will give you rather pink meat as shown in the photo at the end of this entry, if you want it less pink go another 10 minutes (bit I think it’d be a shame.) Pull the saddle out of the oven and put out of the way in a corner while you finish off everything else. Leave the oven on with the vegetables in it, until either you’re ready to serve or you have to displace them to brown the tops of your dumplings. While the saddle was roasting you were simultaneously sorting out those parsnip chips…

Shallow-Frying

Chipping Parsnip

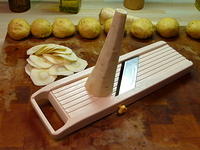
The best way to make the chips shown is to use a mandoline to slice the parsnip really, around 1mm, thin (I have a cheap Benriner mandoline that I’m happy with so far, there’s many to choose from though.) You could also do this with a nice sharp knife, but it’s hard going! Yet another approach is to use a peeler to make long chips by peeling through the parsnip down its length, this is the way I remember my mum doing it and it can result in quite attractive curly/twisty chips!

To do the shallow-frying put plenty of oil (at least 2cm deep) into a small frypan or saucepan. Heat this oil up until the point where a bit of parsnip dipped into it will bubble vigorously. Shallow-fry the parsnip in batches so that the pieces only overlap a little at most, it took three batches for me to do one parsnip in a 19cm pan.

Fry them until they start to turn golden around the edges then carefully flip them all over. When they’re golden all over remove them from the oil and place on some paper towels to de-oil, when they’re all done sprinkle with a little salt. I recommend using chopsticks to flip and remove the chips – make sure they’re not varnished ones though! Be very careful with very hot oil, one small safety measure I employ is to always make sure I use one of the rear burners on the stove for heating oil.

Reducing

Thickening Up

We’re almost done. The vegetables are probably out of the oven now, the dumplings under the grill, the chips sitting on paper towels, and the saddle resting in a corner.

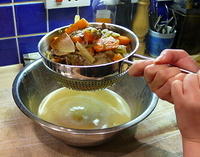
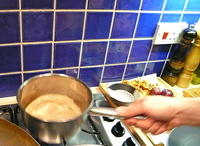
All we need now is a sauce, this is an easy one! Pour the juices from the roasting dish through a sieve into a small saucepan and add the double cream. Get this bubbling away vigorously and reduce until it has the consistency of thickened cream. That’s it, easy like I said. Pour into a dish with a spoon, or a small pouring jug, for serving.

It All Comes Together

Carving the Saddle

It’s really been a crazy marathon up to this point, at peak I had three different things going on at once (roasting hare & veggies, steaming dumplings, and shallow-frying parsnip chips.) Things are coming together nicely now, the hare saddle will have been out of the oven for about 20 minutes but still be warm and ready for carving.

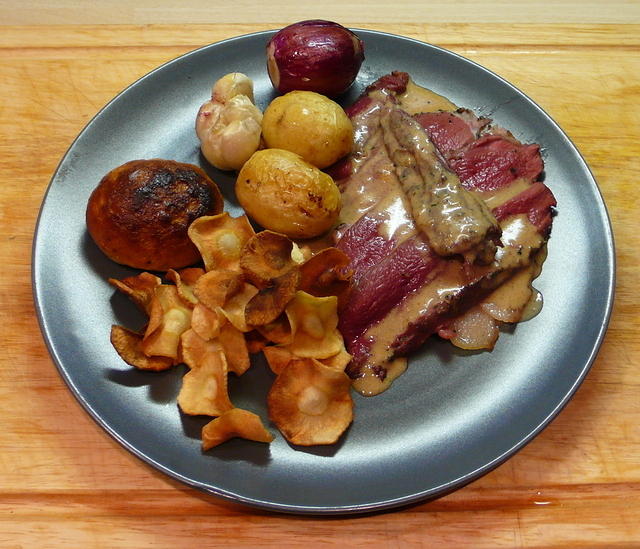
The first thing I did was cut off about 3 inches at the narrow end of the saddle, including the barding bacon. This I put aside to be used the next day. Then I lifted the strips of bacon off the remaining bulk of the saddle and laid them down on the serving plates (which had been in the oven to warm for a short while.) Now take a nice sharp knife and carve good 3 to 5mm thick slices off the back of the saddle, you may wish to peel off the membrane first but I didn’t bother (it should come away easily if you choose to remove it.) You’ll get 4 or 5 nice slices off each side. I laid these out over the bacon, this can kind of be seen in the photo to the right if you look at the larger version.

Ready to Serve

When you’ve carved strips off each side down to the bones, flip the saddle over and carve out the two inner fillets. These inner strips of meat are equivalent the fillet-steak of beef, they really were the most delicious little morsels of hare meat too. Lay out each little fillet over the top of the slices of meat on the serving plate (the strip laid at 90° to the rest of the meat in the adjacent photo.)

Now add an onion, a couple of potatoes, a dumpling or two, half a head of garlic, and a handful of parsnip chips. You can drizzle some sauce over the lot, or leave this to be done at the table.

Serve!

This hare was probably the best bit of meat I’ve eaten in my life, it was that good. I’ve already praised its virtues though, so I won’t go on any further. The dumplings were interesting and turned out quite well, rather light, rather buttery and certainly yeasty. They retained the lemony flavour of the thyme and did their job well: sauce mops.

We enjoyed our harey roast with a good organic dry scrumpy cider and this teamed up well with the flavour of the meat and overall richness of the meal. If it was to be wine I’d probably go for a lighter red, maybe a pinot noir.

Ready to serve

Tail of the Hare

Leftovers

Along with the excess 3 inches of saddle we had 4 potatoes, 2 onions, 2 dumplings, and about 2 tbsp of sauce left over for another time. Most of this went into the harey salad I prepared for lunch the following day, which is a recipe for another time (next in my harey series.) The leftover dumplings actually got sliced up and pan-toasted with eggs for breakfast the next day, so didn’t make it to the salad. The four uncooked dumplings sat wrapped in plastic in the fridge alongside the hare hind legs until used in the final recipe in the series, a harey casserole.

I picked at the filleted bones and nibbled off any larger chunks of meat, I couldn’t help myself. Then the bones went into a freezer bag and joined some other leftovers on the “stock shelf” in the freezer.

As usual there’s a full album of photos for this recipe including many I couldn’t reasonably fit alongside the words.

Finally, here’s a rough timetable to give an idea of how all the above fits together. It isn’t exactly the timing I followed but it’s a close enough blueprint (I actually made the dough way too early, but that’s completely unnecessary.)

18:00
marinate hare
19:00
flip hare and make dumpling dough
19:30
potatoes into the 200°C oven
19:35
kneed dumpling dough and make individual dumplings
20:00
onions & garlic & hare into the 220°C oven, slice the parsnip
20:10
pour stock into hare and reduce temperature to 160°C
20:15
start shallow-frying the parsnip, get water steaming in wok
20:25
remove hare from oven, start steaming dumplings
20:35
move steamed dumplings to grill, remove vegies from oven
20:40
start reducing pan juices mixed with double cream
20:45
slice hare, present everything on plates, serve!

Word Safari

Note: This entry has been restored from old archives.

I’ve been using O’Reilly’s Safari a bit lately, thanks to ACM getting into bed with them and offering something like 600 titles as part of ACM membership. This alone makes the membership worthwhile AFAIC, it’s an excellent benefit. Of course, it is only as good as the books you have access to and I wondered if the selection would be any good. It turns out that the list of available books is actually not all that bad (not excellent, but you have to expect that – pay a bit more to access the full array of titles.)

Safari its self turns out to be quite friendly to use too. The books are presented in sensibly broken up sections (as opposed to “printed page” based) and in plain text using a fairly simple layout. A contents tree and current location sits unobtrusively on the left. And you can add notes and bookmarks, which is very useful but could do with a little web-twopointohey ajaxy goodness (link->form->post->return is so passé). It’s much better than all the crap I’ve seen done in putting magazines online (i.e. IEEE Spectrum, ACM Queue.) Books are a different concept I guess, but not that different maybe the crap magazine efforts stem from a resistance to making redundant all those poor souls who manage print layouts?

Anyway, I’ve resisted trying the Safari thing given that I prefer a good old paper book when I’m not in front of the PC. Thanks to ACM I’ve been able to give it a spin and, while it’s not going to replace print tech books in my life, there’s definitely a place for it in my reading habits.

Now if only Safari Books Online had an Offline mode… and I had a nice gadget for offline reading. Amazon’s Kindle doesn’t seem so crash hot to me, the high end HTC Advantage “phone” might do, but what I’d really like to see is an ASUS Eee in a tablet form (and had longer battery life.) That said, the whole offline thing isn’t going to matter all that much soon, well, now even.

The Problem with Rickmansworth

Note: This entry has been restored from old archives.

It isn’t something I’d ever expect myself to say about a place, but the problem with Rickmansworth is that it is too quiet. OK, so that isn’t really the right way to put it though. It is rather noisy, as far as noise of retards in cars and drunken idiots go. I mean, I guess, culturally quiet. Is that the right word now? It’s really a question of the wrong sort of culture. It’s 18:30 on a Sunday and we’ve had a pretty damn tiring weekend of cleaning, what I want to do right now is relax in a café with an espresso, even a bodgey chain café. But the chain café here closes at 18:00 on a Sunday and that’s that, no espresso for me. Getting an espresso machine and making my own at home isn’t a solution either, I want to head out and sit down somewhere.

Back in Sydney we’d wander up the road to New Orleans at just about any time of day, any day of the week. In the CBD you’d have your choice of bodgey chains but even a few OK places (like Jet in QVB) to serve you a coffee later in the evening. City Extra doesn’t do great coffee, but I could sit there at midnight and sip their non-great coffee (not that I did that very often.) Though I don’t really recall how much this applies on Sundays, which weren’t exactly brilliant even in Sydney.

So, with a definite move coming up we have to ask ourselves the question: to stay in Ricky or to move away? The problem with staying is that it lacks the sort of living conveniences we’d prefer, like late night café, a good deli, a bit of cultural diversity in shopping (just one asian/oriental shop would be fine, sure Waitrose has various “foreign” sections but it just isn’t the same.)

The problem with moving away is that after 2 years we’re finally settling into the place. There’s a lot of open countryside and great woods for walking and we now know them quite well. We know the best pubs in the area, though unfortunately they’re more than a 30 minute walk away. We know a good butcher, though he’s shutting down in a few months. We have a pretty good coffee place to go to, though the hours really aren’t great. We have at least one friend out here too, and we really have very few friends here in the UK. We’ve also started getting along to the quaint little Watford-LUG meetings and it’d be a pity to suddenly pull out of that.

This evening we wandered out only to remember, on getting there, that the shitty coffee place closes at 18:00. So we took a wander down High Street and came to the junction with Church Street, Kat said something like “a crossroad, which way shall we go”… Yep, it’s another of those little crossroads in life. Where will we live for the next one, two, or more years?

Staying in Ricky is going to be the easiest thing to do, and given a good place on the ground with a backyard it is certainly going to be better than the last two years (which have been pretty good.) I’m sure I’ll be very happy with such a move. We could also move to a nearby area, such as Croxley Green or Chorleywood. But they’re both quieter, have far less shops (we’d probably cycle into Ricky for shopping if we moved to either of them), and make the already long train ride into London even longer (only 5 minutes though.)

Another option that is still in the area is Watford, but almost everyone we’ve ever asked about Watford says it is a shithole. That’s not really doing a great job to sell the idea of moving there to us. In the end I expect it’d mostly be much the same but bigger. Bigger isn’t any use if you still can’t get coffee at 18:00 on a Sunday evening. It is a culture thing, if the local coffee place was open at 19:00 on a Sunday we’d be the only people there. Poms spend their evenings in pubs drinking too much beer.

I think the sort of thing we’re looking for would be found closer in to central London. It’d require some research to be sure though, and as you get closer in the chances of being able to afford the rent on a place with a back yard diminishes pretty quickly.

We can’t have everything though, I guess.

Someone suggested to me recently that it’d be really easy to move to the US. I don’t really know if that’s true, but they were in a much better position to know than me. Even if it was simple in the paperwork sense it wouldn’t be simple in any other sense, one such move per decade is enough for me. We’ve got at least another eight years to go with the UK.

Bad pimpl vs. const, beware!

Note: This entry has been restored from old archives.

Here’s an interesting little bug that good old pimpl can easily lead you to, with nary a whistle from the compiler. It actually all boils down to being damn lazy and not doing pimpl properly, but I’ll get to that later. First, let me introduce some lazy
code:

///////////////////////////////////////////////////////////////////////////////
// LazyThing.h
#include <boost/shared_ptr.hpp>
#include <string>

class LazyThing {
public:
    LazyThing();
    void setThing(const std::string & thing, bool value);
    bool getThing(const std::string & thing) const;
    unsigned thingCount() const;
private:
    class LazyThingImpl;
    // here's our pimpl
    boost::shared_ptr<LazyThingImpl> m_impl;
};

///////////////////////////////////////////////////////////////////////////////
// LazyThing.cpp
// #include <LazyThing.h>
#include <map>

// Declare the impl
class LazyThing::LazyThingImpl {
public:
    std::map<std::string,bool> m_thingMap;
};

// Define LazyThing
LazyThing::LazyThing() : m_impl(new LazyThingImpl()) {}

void LazyThing::setThing(const std::string & thing, bool value) {
    m_impl->m_thingMap[thing] = value;
}

bool LazyThing::getThing(const std::string & thing) const {
    return m_impl->m_thingMap[thing];
}

unsigned LazyThing::thingCount() const {
    return m_impl->m_thingMap.size();
}

///////////////////////////////////////////////////////////////////////////////
// main.cpp
// #include <LazyThing.h>
#include <iostream>

int main() {
    LazyThing t;
    t.setThing("foo", false);
    t.setThing("bar", true);
    std::cout << t.thingCount() << std::endl;
    std::cout << (t.getThing("foo") ? "true" : "false") << std::endl;
    std::cout << (t.getThing("bar") ? "true" : "false") << std::endl;
    std::cout << (t.getThing("baz") ? "true" : "false") << std::endl;
    std::cout << t.thingCount() << std::endl;
    return 0;
}

Both g++ and icc will compile this code with no errors or warnings (ignoring some spurious unrelated ones from icc when -Wall is set.) When we run the resultant binary we see this:

2
false
true
false
3

Fair enough? Well no, the code has a bug. Though you don’t know for sure since I haven’t given a specification for getThing, let it be this: returns the value set for thing; returns false if thing has not been set. So, that final 3 is a bit disturbing. Hey, isn’t getThing supposed to be const?! What’s the root of this? If you’ve much experience with C++/STL then you’ll know that operator[] is a non-const member that inserts a default-constructed element into the std::map if no element previously exists. You’ll know this either from properly reading the documentation, or from having this sort of situation bite you in the arse before (prompting you to properly read the documentation;) Quite simply, the code should not be using operator[] in getThing, that is completely retarded. But, you say, if it is non-const then why did the compiler let us call it?! The understanding is that a const method is not permitted to make non-const calls on data members. Right? Alas, this breaks down with pointers!

If we take the above code and remove the pimpl, embed the std::map into LazyThing, and then try to implement getThing with return m_map[thing] the code won’t compile. As we’d hope! If we take the above and change the boost::shared_ptr pimpl container to a plain LazyThingImpl* then the code will compile and exhibit the disturbing behaviour above. (In other words: don’t blame the shared_ptr.)

So, what gives? Compiler getting lost or does the C++ standard let this happen? In fact, the behaviour here is logically correct, even though it feels wrong. If we refer to 9.3.2 of the spec, namely “the this pointer“, and look at paragraph 2 we see what seems to be the extent of the power of applying const to a member function.

const member function, the object for which the function is called is
accessed through a const access path; therefore, a const member function
shall not modify the object and its non-static data members.

So a const member can’t modify non-static data members, if the std::map is a member then operator[] clearly modifies it, verboten! If a LazyThingImpl* is a member then calling a non-const method on the object the pointer points to clearly does not modify the pointer. Sure, it modifies the destination instance but I think that is beside the point… that instance is not the member in question, the pointer is. (And yeah, you can modify static “members” in const member functions too.)

So, we knew all this already right? In general it isn’t new to me, I’ve hit the const calling non-const on pointer “problem” before. However the pattern in the code above is simplified (a lot) from something I wrote last week, I committed this crime. At the root of the crime is a sin: laziness. Thus the name of the class! You see, you’re not really supposed to implement pimpl as “pointer to data struct”, as named the pattern is “pointer to implementation” and we can avoid the whole problem above, the foolish mistake of using operator[], by doing pimpl the right way.

Brace yourself for another code dump!

///////////////////////////////////////////////////////////////////////////////
// Thing.h
#include <boost/shared_ptr.hpp>
#include <string>

class Thing {
public:
    Thing();
    void setThing(const std::string & thing, bool value);
    bool getThing(const std::string & thing) const;
    unsigned thingCount() const;
private:
    class ThingImpl;
    boost::shared_ptr<ThingImpl> m_impl;
};  

///////////////////////////////////////////////////////////////////////////////
// Thing.cpp
// #include <Thing.h>
#include <map>

// Declare the impl - mirroring the Thing public interface!
class Thing::ThingImpl {
public:
    void setThing(const std::string & thing, bool value);
    bool getThing(const std::string & thing) const;
    unsigned thingCount() const;
private:
    std::map<std::string,bool> m_thingMap;
};

// Define ThingImpl methods
void Thing::ThingImpl::setThing(const std::string & thing, bool value) {
    m_thingMap[thing] = value;
}

bool Thing::ThingImpl::getThing(const std::string & thing) const {
    std::map<std::string,bool>::const_iterator res = m_thingMap.find(thing);
    if (res == m_thingMap.end()) {
        return false;
    }
    return res->second;
}

unsigned Thing::ThingImpl::thingCount() const {
    return m_thingMap.size();
}

// Define Thing methods
Thing::Thing() : m_impl(new ThingImpl()) {}
    
void Thing::setThing(const std::string & thing, bool value) {
    m_impl->setThing(thing, value);
}   
    
bool Thing::getThing(const std::string & thing) const { 
    return m_impl->getThing(thing);
}   

unsigned Thing::thingCount() const {
    return m_impl->thingCount();
}

I’ve left out main this time, aside from the altered class name it is identical to the previous main. So, the difference is that Thing is now no more than a proxy, every call to Thing just makes the same call to m_impl. It’s important that it is the same call too, otherwise you might get yourself lost. The public interface to ThingImpl should mirror that of Thing including constness! If you made ThingImpl‘s getThing non-const you’d still be permitted to make the operator[] mistake. As the code is above, if you tried using operator[] on m_map in Thing::ThingImpl::getThing the compiler would tell you to get buggered:

:; g++ -Wall -Wextra -pedantic Thing.cpp -o Thing
Thing.cpp: In member function 'bool Thing::ThingImpl::getThing(const std::string
&) const':
Thing.cpp:38: error: no match for 'operator[]' in '((const Thing::ThingImpl*)thi
s)->Thing::ThingImpl::m_thingMap[thing]'
/usr/include/c++/4.1.3/bits/stl_map.h:340: note: candidates are: _Tp& std::map<_
Key, _Tp, _Compare, _Alloc>::operator[](const _Key&) [with _Key = std::basic_str
ing<char, std::char_traits<char>, std::allocator<char> >, _Tp = bool, _Compare =
 std::less<std::basic_string<char, std::char_traits<char>, std::allocator<char> 
> >, _Alloc = std::allocator<std::pair<const std::basic_string<char, std::char_t
raits<char>, std::allocator<char> >, bool> >] <near match>

Love those g++ template messages! This is what I like to see though, the compiler letting me know when I’ve done something stupid. So, remember:

pimpl is “pointer to implementation

This goes far beyond this silly example using std::map::operator[]. If you only move data members to your impl and access them all via the pimpl from logic in the interface class then you’ve entirely lost the enforcement of const. You could modify a std::string, increment an int, or whathaveyou. Know better, mirror the interface in the impl and make the data members private.

(A quick Google shows up a few pimpl examples out there on the web that do what I’ve called “pointer to data struct.” Then again, I don’t have 100% confidence that my interpretation of “implementation” is that of the originator(s) of the concept anyway – protecting the const enforcement as strongly as possible seems wise to me though.)

Harey Stock

Note: This entry has been restored from old archives.

Preamble, hare rama hare rama

This is my first harey recipe, and covers the making of a stock that’ll be used in two other harey recipes. It’s a pretty straightforward thing to do and a logical starting point. Unfortunately we’re busy cleaning the apartment this weekend as estate agents will be in on Monday to do an assessment and take photos… thus I may not get any other recipes out until next weekend. (We’ve decided that it is time to move into something that isn’t an apartment, and the owner has decided that it’s time to sell.)

Anyway, everyone should know how to make a stock and if you don’t you should learn! It really is rather trivial. These days you can get pretty good stock from the supermarket, and I mean the stuff in the fridge not the dreaded cubes (which I do use from time to time and I always have a few kicking around in the cupboard.) However, I do think you can make a better stock. It’s not just about better though, it’s about making optimal use of your food. Bones the butcher would otherwise throw out (these days), leftover roast chicken, whatever’s about really. Making stock is a skill worth learning and it’ll serve you well in the dark days ahead.

Of course this isn’t going to be a very typical stock, but you can look at the recipe below as a template. For example, you could replace the hare parts with a broken up roast chicken carcass and some chicken wings (from some good free-range birds!) The stock described here comes out pretty strong and quite gamey… good for recipes involving the rest of the hare but probably not much good for other cooking.

Input

Ingredients

I’m going to be a bit rough with the ingredients list here, precision isn’t necessary. The photo on the right really gives all the information you need, I could probably leave the list below out! Please use happy vegetables for happy flavours… save the bendy carrots for some chooks, local horses, or something. (And don’t buy so many that you let them get into that state next time… happens to me all the time, not having much livestock nearby I eat them raw before they can get too bad.) The ingredients can be multiplied by as many times as you’d like to make more stock, it’s great for freezing (and you can reduce it first to use less freezer space.) I don’t recommend trying to make it in a lesser quantity though, this is as small as I’d go for making a stock.

550g
hare forelegs and offcuts
drizzle
light olive oil
3 medium
carrots
2 medium
onions
3 sticks
celery
3
fresh bayleaves
6 sprigs
fresh thyme
handful
fresh parsley

Algorithm

Browned Hare Bits

First, preheat your oven to 220C. Ensure hare bits are clean, pat dry if wet, and toss with some oil in a bowl. Spread the bits around a baking tray and place in the hot oven for a 15 minute sizzle. Meanwhile peel the carrots (or don’t if they look pretty good) and chop them into about 3 or 4 pieces. Then quarter the onions, and cut the celery into 2 inch lengths.

Ready for simmer'n

After the hare bits have sizzled for 15 minutes remove from the oven and place the hare and all juices and scrapings from the pan into a smaller sized stock pot (22cm in my case.) Throw in the herbs and then pack in the vegetables, pack everything down as tightly as you can. The idea is that you want as little liquid as possible. Flush any remaining bits and oil from the hare roasting pan into the stock pot with about 500ml of water. Then top up the with just enough water to barely cover the content (note that the veggies may float a little, be careful not to add too much water.) In the end I added about 1.5l (photo left.)

Urgh, the strain!

Bring the pot to a gentle simmer, then place it on the smallest flame your stove can do. If, even then, it simmers any more than lethargically you might want to, assuming you have a gas stove, get yourself a simmer mat/ring for future simmering occasions (a fallback option, if you use an oven-proof pot, is to put it in a 120C oven after getting it to simmering point on the stove.) Now you can just leave it alone for about 3 hours, though you might want to give it a good stir every hour or so (I did, but it probably doesn’t matter.)

When the simmering time is up take the pot off the heat and give it a good 30-minutes to full-hour to cool down. When cool enough to handle strain the stock through a large-hole sieve or colander. Give it a good pressing to get out as much fluid as you can without pressing mashed vegetable through the holes in your strainer. Now strain back into the rinsed stock pot through a fine sieve (if you’re after a clearer stock you could do another step straining through wetted muslin, more about that some other time maybe.) Put the strained stock back onto the stove and re-heat/reduce as required for your purposes. I got about 1 litre of stock out of this which I then reduced down to 500ml of fairly rich stock. Alternatively, refrigerate or freeze the stock for some future cooking endeavour!